
Azure is the latest technology trend that is going around in the technical community and many developers have already started and starting to work with Azure. Once the first VM (Virtual Machine) is created, many people start to look for a option to transfer locally stored data and application setups to newly created VM. You will have no issue if you have setup a site-to-site VPN to your Azure.
However many does not have the site-to-site VPN setup and in that case Azure VM does not allow you to access your local network or local machine.
However many does not have the site-to-site VPN setup and in that case Azure VM does not allow you to access your local network or local machine.
So what will be the solution for this? There are couple of solution for this and easiest one for me so far is using Remote Desktop Connections feature to share local drives with new Azure VM.
Lets see how we can activate this feature.
As the first step you need to go to Azure Management Portal and click on the Connect.

Once you click on the connect, it will download a Remote Desktop Connection file and you have to open it. It will have all the info you required to connect to your VM and in this blog post what we only interested in is in the “Local Resources” Tab.
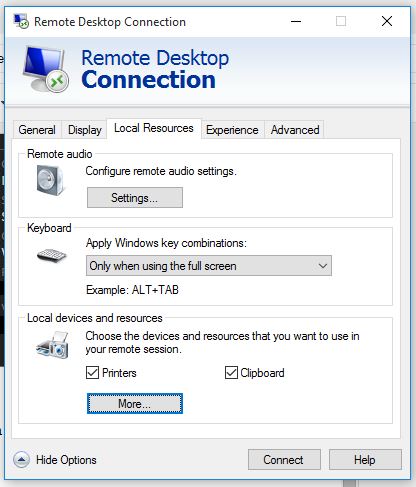
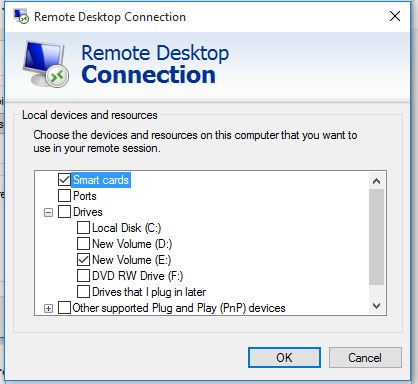
Click on the More button on the “Local Resources” Tab. It will display the Local devices and resource dialog. Expand the Drives node and select the drives that you want to access from your newly created VM and then click “OK” and connect to your VM.
Once the Azure Remote Desktop Connection has opened you can use File Explorer in the VM to open the local drive and free drag-and-drop file between the local drive and the drives configured in the Azure VM
Addition to above method there are various methods and tools available to create a secure a pipe for data transfer between VM and local machine.
Please provide your feedback with a comment.
Thank you and Regards,
Tharanga Chandrasekara